Want your home automation system to be smarter and know when you’re sleeping?
Like the idea of arming an alarm or using dimmed lights when you’re in bed at night?
This guide for how to make a bed occupancy will walk you through exactly what you need and give you some ideas about how to tie it into your system.
In this guest post from a fellow tinkerer, we’ll cover:
- Why I Needed a Bed Occupancy Sensor
- How I Hacked Together My WiFi bed occupancy sensor
Implementation Tips - Commercial Bed Sensor Alternatives for the non-DIY Folks
Why I Needed a Bed Occupancy Sensor
 My bedroom lights were driving me crazy – they worked great when the PIR sensor detected someone entering the room and turned them on, but, not so great when I triggered the sensor in my sleep, or if I got up in the middle of the night to use the restroom, or if someone came into the room while I’m sleeping.
I needed a way for the controller to know when I was in bed and when I wasn’t – and how long on both accounts. Using that information, I could set the house in or out of sleep mode – which controls temperatures, security cameras, door locks, and lighting events – most importantly, whether the bedroom lights turn on and at what brightness.
Possible Uses for a Bed Occupancy Sensor
Of course, the ways that I use my bed sensor could be expanded and improved. Here are some other ideas:
- Use Tasker to connect the sensor to your phone to control your alarm clock
- Connect the sensor to your Sonos or Google Home system to play a soothing good night or good morning tune
- Have a morning alarm that only turns off when you get out of bed, no snoozing!
- Your lights could come on at 100% during the day and at 10% at night or use a red light at night to protect your night vision
- Arm your security system when you go to bed
- Lock any smart locks if they are unlocked
- Activate motion detection on any indoor cameras
It’s possible I missed other brilliant ones. Be sure to drop a line in the comments below with your awesome idea to deflate my ego. My wife will thank you.
How I Hacked Together a WiFi bed occupancy Sensor
The solution I used was to place a Force Sensitive Resistor (FSR) between the mattress and the box springs. I’ll go through the pros and cons of my setup, and you can also check out other options below.
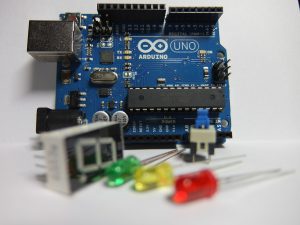
Here’s an overview of the components I used:
- Arduino Uno w/ Ethernet Shield
- 24″ Force Sensitive Resistor(FSR)
- Voltage divider
- Old WiFi router used as a bridge for the Ethernet shield
- Homeseer3 (my existing controller)
- Homeseer3 Arduino plugin
The Uno + Ethernet shield + router could be replaced with an esp8266 + Wi-Fi for less money. You can get a barebones esp8266 off of aliexpress for about $1.20 per.
Hardware Components
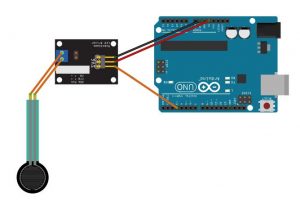
The FSR is wired through a voltage converter to an Arduino. The FSR sits between the mattress and the box spring and connects to the voltage divider and onto the Arduino. The Arduino takes a measurement on an analogue pin and sends that value to the Homeseer Arduino plugin (over TCPIP). The plugin converts that value to 0-100%.
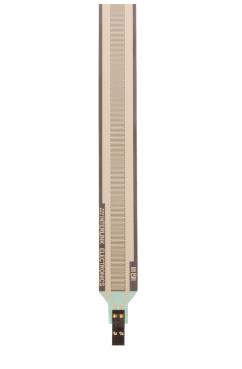
24 Inch Force Sensing Resistor (FSR) Strip [Interlink] – $18
http://www.trossenrobotics.com/p/24-inch-force-sensing-resistor.aspx
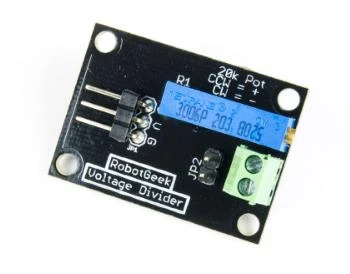
RobotGeek Voltage Divider [RobotGeek] – $5
http://www.trossenrobotics.com/robotgeek-voltage-divider
Arduino + Ethernet Shield (or WiFi Sheild) – $14
2-wire sensor jumper wire – male/male (2-4ft)
3-wire sensor jumper wire – female/female (2-4ft)
It’s a pretty straightforward setup, but here the diagram of how it all ties together:
Software Implementation
Since I use Home Seer, there was a readily available Arduino plug-in that provides a software API for the Arduino, and the creation of devices which can track values on the input pins of the Arduino. So, that made the set up pretty simple.
How My WiFi Bed Sensor Works
When I’m not in bed, the Arduino pin returns a value of about 30%, when I’m in the bed, the value is always above 60%. Every minute, Home Seer checks the value of the pin and increments or decrements a counter based on those thresholds. Once the counters reach a pre-defined number (-10 or 10 in my case), the wake or sleep house modes and events are triggered. Using counters allows for more precise control of the timing of associated events without relying directly on the data coming from the Arduino.
You might not want the action of getting out of bed for only a few minutes to trigger a wake mode; and a single erroneous reading from the sensor could cause unwanted behavior – counters help to mitigate both. Of course, you can adjust these values to suit your purposes.
The Home Seer plugin does not support WiFi shields – only Ethernet shields.
If you aren’t using Home Seer, alternative options to integrate the Arduino are plentiful – but they might not be as simple or straightforward as the plugin mentioned here. If you’ve had any experience with those, feel free to leave a note in the comments so that others can benefit from your work.
Tips for Your Bed Sensor
- Use your favorite Arduino or Arduino clone – keeping in mind you’ll need an Ethernet or WiFi shield to upload the sensor data.
- Use electrical tape or heat-shrink tubing to secure the connectors – it’s a pain to reconnect these once they are under the mattress.
- Place the Arduino in a secured project box underneath or beside your bed.
- Use a long cable (2-4’) between the FSR and the voltage divider so the Arduino can sit on the floor.
- You could use a wireless bridge or a wireless router in client-mode in lieu of a Wifi bridge
- To detect an occupant on both sides of the bed, connect a second sensor to another input pin on the Arduino.
Do me a Solid and Share this With Your Friends!
Alternative Bed Sensor Solutions
Of course, the FSR isn’t the only route you could take.
- You could use a pressure mat and wire it to a z-wave contact sensor.
- You could use a motion sensor mounted under the bed to see you when you step out in the morning or in at night. But, determining if you’re going or coming would be tricky and a pressure sensor will be more robust.
- Using a capacitive sensor is also a possibility, but the implementation probably won’t be as “neat.” Think ribbons of wire running all over the bed under your sheets. See https://www.openhardware.io/view/65/Bed-Occupancy-Sensor for more details.
- You could get an industrial pressure sensor and put it under the legs of the bed and then tie it into an Arduino or ESP board. Of course, you would have to write some software to tell what the weight of the bed is compared to its weight with you in it.
Have a different idea? Let me know in the comments below.
Commercial Bed Sensor Alternatives for the non-DIY Folks
So what do you do if you have more money than time or interest?
One option is Eight Sleep’s bed sensor. They started out as a Kickstarter project and are still pretty new, but early reviews seem positive. They do have IFTTT integration to make working with your existing system easier.
You could probably also repurpose one of the Angelcare baby monitors too. It’s a small mat that goes under a crib mattress, but you should be able to throw it down at the end of your bed and get the behavior that you want.
Have Any Questions or Tips to Share?
Well, what do you think? Ready to set your smart home game up a level? Let us know how it goes down below.

Hi, I’m Jody. I graduated with honors with a Masters of Science in Computer Engineering and have over 15 years of experience working as an engineer with electronics products. I’m a lifelong learner and tinkerer and enjoy automating things around the house so I can solve bigger problems than getting out of bed to check if the garage door is closed . . . like too little sleep!
Nice looking project!
I’m curious how you placed the sensor on the bed, horizontal, vertical, something else?
Thanks, it was down the length of the bed, though it would be an interesting experiment to put a log FSR across the bed to try to detect either person.